# Mint an NFT with IPFS
Non-fungible tokens (NFTs) allow users to create and trade digital items with differing values. Go from nothing to creating a freshly-minted NFT token and storing it on IPFS with the help of services like Pinata (opens new window) and nft.storage (opens new window).
Since IPFS isn't a blockchain, we'll be leveraging the power of the Ethereum blockchain for this guide. However, the steps described here can just as easily be applied to other blockchains.
# A short introduction to NFTs
This guide doesn't go into the intricacies of NFTs, or even why they're important. This guide is solely to help you understand how to host NFTs on IPFS and how the process can be expanded to include other aspects of blockchain development.
That being said, we're going to cover the very basics of NFTs here so that everyone's on the same page. If you're interested in a deeper dive in the world of NFT best practices and NFT development in general, head over to NFT School (opens new window) for concept guides, tutorials, and how-tos.
# What NFTs are made of
There are a few key features that define an NFT, regardless of platform.
First, each token has a unique id that distinguishes it from all other tokens. This is in contrast to a fungible token like Ether ETH, which exists as a quantity attached to an account or wallet. There is no way to tell one ETH from another. Because each NFT is unique, they're owned and traded individually, with the smart contract keeping track of who owns what.
Another key feature of an NFT is the ability to link to data that is stored outside of a smart contract. Storing or processing data outside of a smart-contract is known as being off-chain. Because data that's stored on-chain needs to be processed, verified, and replicated across the entire blockchain network, it can be very expensive to store large amounts of data. This is a problem for many NFT use cases, especially tokens that represent digital collectibles or artwork, where storing the entire work could cost the equivalent of millions of US Dollars.
# How IPFS helps
When an NFT is created and linked to a digital file that lives on some other system, how the data is linked is very important. There are a few reasons why traditional HTTP links aren't a great fit.
With an HTTP address like https://cloud-bucket.provider.com/my-nft.jpeg, anyone can fetch the contents of my-nft.jpeg, as long as the owner of the server pays their bills. However, there's no way to guarantee that the contents of my-nft.jpeg are the same as they were when the NFT was created. The server owner can easily replace my-nft.jpeg with something completely different at any time, causing the NFT to change its meaning.
This problem was demonstrated by an artist who pulled the rug (opens new window) on NFTs he created by changing their images after they were minted and sold to others.
IPFS solves this problem thanks to Content Addressing. Adding data to IPFS produces a content identifier (CID) that's directly derived from the data itself and links to the data in the IPFS network. Because a CID can only ever refer to one piece of content, we know that nobody can replace or alter the content without breaking the link.
Using the CID, anyone can fetch a copy of the data from the IPFS network as long as at least one copy exists on the network, even if the original provider has disappeared. This makes CIDs perfect for NFT storage. All we need to do is put the CID into an ipfs:// URI like ipfs://bafybeidlkqhddsjrdue7y3dy27pu5d7ydyemcls4z24szlyik3we7vqvam/nft-image.png, and we have an immutable link from the blockchain to the data for our token.
Of course, there may be some cases in which you do want to change the metadata for an NFT after it's been published. That's no problem! You'll just need to add support to your smart contract for updating the URI for a token after it's been issued. That will let you change the URI to a new IPFS URI while still leaving a record of the initial version in the blockchain's transaction history. This provides accountability and makes it clear to everyone what was changed, when, and by whom.
# Minty
To help explain how NFTs and IPFS can work together, we've created Minty - a simple command-line application to automatically mint an NFT and pin it to IPFS using Estuary (opens new window), nft.storage (opens new window), or Pinata (opens new window).
Production NFT platforms are a fairly complex thing. As with any modern web application, there are lots of decisions to make surrounding the tech stack, user interface conventions, API design, and so on. Blockchain-enabled d-apps also need to interact with user wallets such as Metamask (opens new window), further increasing their complexity.
Since Minty was written to demonstrate the concepts and process of minting IPFS-backed NFTs, we don't need to get caught up in all the details of modern d-app development. Instead, Minty is a simple command-line app written in Javascript.
# Install Minty
Let's get Minty installed so we can start playing around with NFTs! To install and run Minty, you must have NPM installed. Windows is not currently supported. Installation of Minty is fairly simple. Just download the GitHub repository, install the NPM dependencies, and start the local testnet environment.
Clone the Minty repository (opens new window) and move into the
mintydirectory:git clone https://github.com/yusefnapora/minty cd mintyInstall the NPM dependencies:
npm installAdd the
mintycommand to your$PATH. This step is optional, but it makes it easier to run Minty from anywhere on your computer:npm linkRun the
start-local-environment.shscript to start the local Ethereum testnet and IPFS daemon:./start-local-environment.sh > Compiling smart contract > Compiling 16 files with 0.7.3 > ...This command continues to run. All further commands must be entered in another terminal window.
# Deploy the contract
Before running any of the other minty commands, you'll need to deploy an instance of the
smart contract:
minty deploy

> deploying contract for token Julep (JLP) to network "localhost"...
> deployed contract for token Julep (JLP) to 0x5FbDB2315678afecb367f032d93F642f64180aa3 (network: localhost)
> Writing deployment info to minty-deployment.json
This deploys to the network configured in hardhat.config.js, which is set to the localhost network by default. If you get an error about not being able to reach the network, make sure you started the local development network with ./start-local-environment.sh.
When this contract is deployed, the address and other information about the deployment are written to minty-deployment.json. This file must be present for subsequent commands to work.
# Mint an NFT
Once you have the local Ethereum network and IPFS daemon running, minting an NFT is incredibly simple. Just specify what you want to tokenize, the name of the NFT, then add a description to tell users what the NFT is for.
# Create something to mint
First, let's create something to mint. NFTs have a huge range of use-cases, and you can mint whatever you want! For this example, we're going to create a ticket for a flight to the moon!
Create a file called
flight-to-the-moon.txt:touch ~/flight-to-the-moon.txtOpen the file and enter some flight information:
THE INTERPLANETARY TRAVEL COMPANY
---------------------------------
Departing: Cape Canaveral, Earth
Arriving: Base 314, The Moon
Boarding time: 17:30 UTC
Seat number: 1A
Baggage allowance: 5kg
Save and close the file.
# Mint the file
Now we're going to tokenize our ticket into an NFT. This process is often called minting.
Call the
mintcommand and supply the file we want to mint, the name of our NFT, and a description:minty mint ~/flight-to-the-moon.txt --name "Moon Flight #1" --description "This ticket serves as proof-of-ownership of a first-class seat on a flight to the moon." > 🌿 Minted a new NFT: > Token ID: 1 > Metadata URI: ipfs://bafybeic3ui4dj5dzsvqeiqbxjgg3fjmfmiinb3iyd2trixj2voe4jtefgq/metadata.json > Metadata Gateway URL: http://localhost:8080/ipfs/bafybeic3ui4dj5dzsvqeiqbxjgg3fjmfmiinb3iyd2trixj2voe4jtefgq/metadata.json > Asset URI: ipfs://bafybeihhii26gwp4w7b7w7d57nuuqeexau4pnnhrmckikaukjuei2dl3fq/flight-to-the-moon.txt > Asset Gateway URL: http://localhost:8080/ipfs/bafybeihhii26gwp4w7b7w7d57nuuqeexau4pnnhrmckikaukjuei2dl3fq/flight-to-the-moon.txt > NFT Metadata: > { > "name": "Moon Flight #1", > "description": "This ticket serves as proof-of-ownership of a first-class seat on a flight to the moon.", > "image": "ipfs://bafybeihhii26gwp4w7b7w7d57nuuqeexau4pnnhrmckikaukjuei2dl3fq/flight-to-the-moon.txt" > }The
minty mintcommand returns the id of the new token, some metadata containing thenameanddescriptionwe provided, and an IPFS URI to the file we used for our NFT asset. TheMetadata URIin the output above is the IPFS URI for the NFT Metadata JSON object that's stored on IPFS.
Great! You've created your NFT, but it's only available to other people as long as you have your IPFS node running. If you shut down your computer or you lose your internet connection, then no one else will be able to view your NFT! To get around this issue, you should pin it to a pinning service.
# Pin your NFT
To make the data highly available without needing to run a local IPFS daemon 24/7, you can request that a remote pinning service store a copy of your IPFS data on their IPFS nodes.
Any pinning service that supports the IPFS Remote Pinning API (opens new window) can be used with Minty.
Below we'll show how to configure Minty to two different pinning services. Either one will work, so you'll only need to sign up to one service to try things out.
# Option 1: Pinata
Pinata (opens new window) is one of the oldest and most popular IPFS pinning services, and their free storage tier makes it easy to sign up and experiment.
# Sign up to Pinata
To use Pinata to pin your data, you need to sign up for an account.
- Head over to pinata.cloud (opens new window).
- Click Sign up and use your email address to create an account.
Pinata gives each user 1GB of free storage space, which is plenty for storing a few NFTs.
# Get an API key
You need to grab an API key from Pinata. Your API key allows Minty to interact with your Pinata account automatically.
Log into Pinata and select API keys from the sidebar menu.
Click New Key.
Expand the Pinning Services API drop-down and select all the options under Pins:
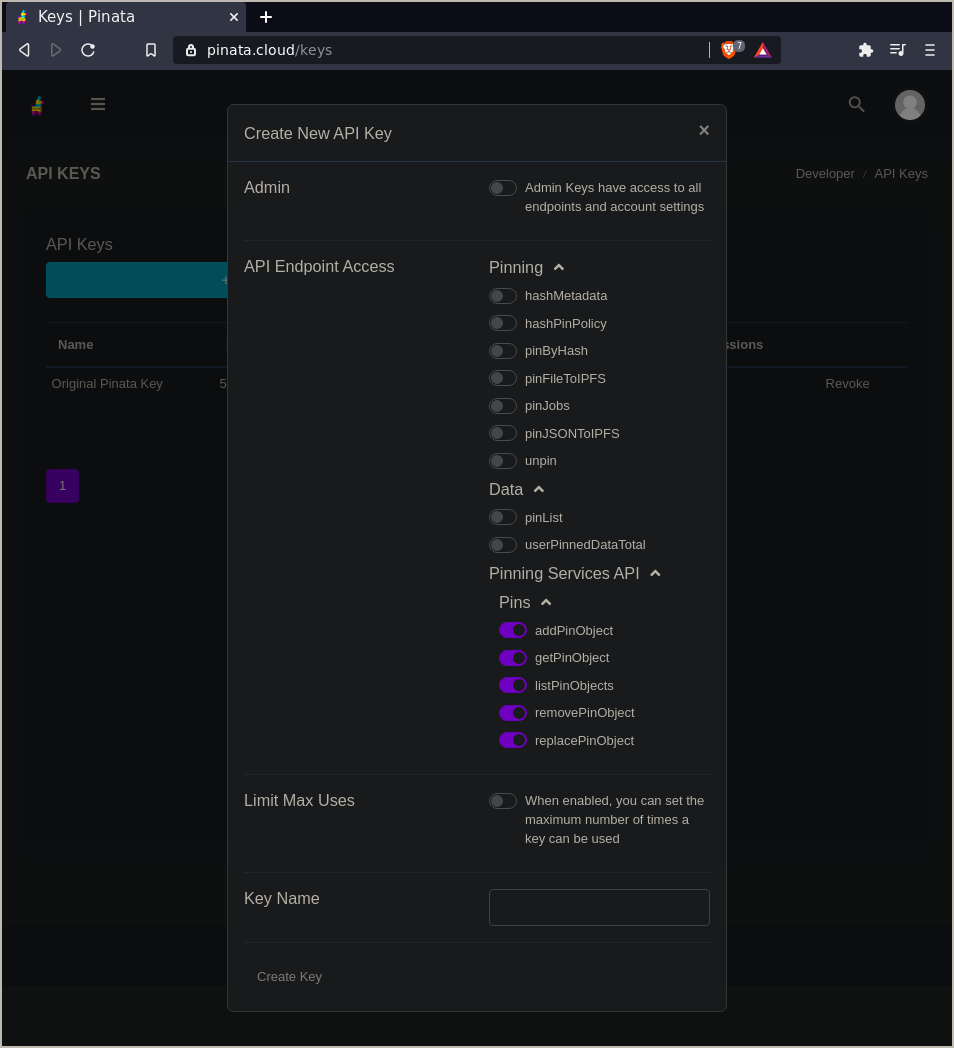
Pinata will give you an API key, and API secret, and a JWT:
API Key: 43537d17e88805007086
API Secret: 492b24f041b9120cbf8e35a247fb686793231a3d89045f1046a4f5b2d2175082
JWT: eyJhbGciOiJIUzI1NiIsInR5cCI6IkpXVCJ9.eyJ1c2VySW5mb3JtYXRpb24iOnsiaWQiOiJiZDQ3NjM1Ny1lYWRhLTQ1ZDUtYTVmNS1mM2EwZjRmZGZmYmEiLCJlbWFpbCI6InRhaWxzbm93QHByb3Rvbm1haWwuY29tIiwiZW1haWxfdmVyaWZpZWQiOnRydWUsInBpbl9wb2xpY3kiOnsicmVnaW9ucyI6W3siaWQiOiJGUkExIiwiZGVzaXJlZFJlcGxpY2F0aW9uQ291bnQiOjF9XSwidmVyc2lvbiI6MX0sIm1mYV9lbmFibGVkIjpmYWxzZX0sImF1dGhlbnRpY2F0aW9uVHlwZSI6InNjb3BlZEtleSIsInNjb3BlZEtleUtleSI6IjQzNTM3ZDE3ZTg4ODA1MDA3MDg2Iiwic2NvcGVkS2V5U2VjcmV0IjoiNDkyYjI0ZjA0MWI5MTIwY2JmOGUzNWEyNDdmYjY4Njc5MzIzMWEzZDg5MDQ1ZjEwNDZhNGY1YjJkMjE3NTA4MiIsImlhdCI6MTYxNjAxMzExNX0.xDV9-cPwDIQInuiB0M--XiJ8dQwwDYMch4gJbc6ogXs
We just need the
JWT. You can ignore theAPI KeyandAPI Secretfor now.Copy the
config/pinata.env.examplefile toconfig/.env:cp config/pinata.env.example config/.envInside
config/.envadd your JWT token to thePINNING_SERVICE_KEYline between the double quotes":PINNING_SERVICE_KEY="eyJhbGciOiJIUzI1NiIsInR5cCI6IkpXVCJ9.eyJ1c2VySW5mb3JtYXRpb24iOnsia..."Minty can now connect to Pinata and pin NFT data to your account!
# Option 2: nft.storage
nft.storage (opens new window) is a new service offered by Protocol Labs to store public NFT data. It's currently a free public beta, so it's super easy to sign up and try it out.
# Sign up to nft.storage
To use nft.storage for your NFT data, you'll need to sign up for an account. You'll also need a GitHub account for logging in, if you don't already have one.
- Head over to nft.storage (opens new window).
- Click Register and use your GitHub account to register.
# Get an API Key
You need to copy an API key from the nft.storage site and put it where Minty can find it.
- Log into nft.storage and select Manage API Keys from the top menu.
- Click New Key.
- The new key should show up in the list. Copy the key to your clipboard. It should be a long string starting with
ey....
We need to put the key into a file where Minty can find it.
Copy the
config/nft.storage.env.examplefile toconfig/.env:cp config/nft.storage.env.example config/.envInside
config/.envadd your API key to thePINNING_SERVICE_KEYline between the double quotes":PINNING_SERVICE_KEY="eyJhbGciOiJIUzI1NiIsInR5cCI6IkpXVCJ9.eyJ1c2VySW5mb3JtYXRpb24iOnsia..."Minty can now connect to nft.storage and pin NFT data to your account!
# Deploying to a testnet
Take a look at the Hardhat configuration docs (opens new window) to learn how to configure a JSON-RPC node and deploy this contract to a testnet. Once you've added a new network to the Hardhat configuration, you can use it by setting the HARDHAT_NETWORK environment variable to the name of the new network when you run minty commands. Alternatively, you can change the defaultNetwork in hardhat.config.js to always prefer the new network.
Deploying this contract to the Ethereum mainnet is a bad idea since the contract itself lacks any access control. See the Open Zeppelin article (opens new window) about what access control is and why it's important to have.
# How Minty works
So we minted an NFT, added it to an Ethereum blockchain, and hosted it on IPFS. Now we're going to dive into exactly what the contract does and why. We're also going to explore the IPFS side of things and how the NFT itself is stored.
# The Minty smart-contract
Minty uses a smart-contract written in Solidity (opens new window), the most popular language for Ethereum development. The contract implements the ERC-721 Ethereum NFT standard (opens new window), by virtue of inheriting from the very convenient and fully featured OpenZeppelin ERC721 base contract (opens new window).
Because the OpenZeppelin base contract provides so much of the core functionality, the Minty contract is quite simple:
pragma solidity ^0.7.0;

import "hardhat/console.sol";
import "@openzeppelin/contracts/token/ERC721/ERC721.sol";
import "@openzeppelin/contracts/utils/Counters.sol";

contract Minty is ERC721 {
    using Counters for Counters.Counter;
    Counters.Counter private _tokenIds;

    constructor(string memory tokenName, string memory symbol) ERC721(tokenName, symbol) {
        _setBaseURI("ipfs://");
    }

    function mintToken(address owner, string memory metadataURI)
    public
    returns (uint256)
    {
        _tokenIds.increment();

        uint256 id = _tokenIds.current();
        _safeMint(owner, id);
        _setTokenURI(id, metadataURI);

        return id;
    }
}
If you read the OpenZeppelin ERC721 guide (opens new window), you'll see that the Minty contract is extremely similar. The mintToken function simply increments a counter to issue token ids, and it uses the _setTokenURI function provided by the base contract to associate the metadata URI with the new token id.
One thing to notice is that we set the base URI prefix to ipfs:// in the constructor. When we set a metadata URI for each token in the mintToken function, we don't need to store the prefix since the base contract's tokenURI accessor function will apply it to each token's URI.
It's important to note that this contract is not production-ready. It doesn't include any access controls (opens new window) that limit which accounts are allowed to call the mintToken function. If you decide to develop a production platform based on Minty, please explore the access control patterns that are available and consider which should apply to your platform's access model.
# Deploying the Contract
Before you can mint new NFTs, you need to deploy the contract to a blockchain network. Minty uses HardHat (opens new window) to manage contract deployment. By default, Minty deploys to an instance of the HardHat development network (opens new window) that's been configured to run on your machine's localhost network (opens new window).
It's also possible to deploy the contract to an Ethereum test network (opens new window) by editing the hardhat.config.js file in the minty repo. See the HardHat documentation (opens new window) to learn how to configure HardHat to deploy to a node connected to a testnet, either running locally or hosted by a provider such as Infura (opens new window). Because deployment consumes ETH as gas, you'll need to obtain some test ETH for your chosen network and configure hardhat to use the correct wallet.
# Calling the mintToken smart-contract function
Let's look at how Minty's JavaScript code interacts with the smart contract's mintToken function. This happens in the mintToken method of the Minty class:
async mintToken(ownerAddress, metadataURI) {
  // The smart contract adds an ipfs:// prefix to all URIs,
  // so make sure to remove it so it doesn't get added twice
  metadataURI = stripIpfsUriPrefix(metadataURI)

  // Call the mintToken smart contract function to issue a new token
  // to the given address. This returns a transaction object, but the
  // transaction hasn't been confirmed yet, so it doesn't have our token id.
  const tx = await this.contract.mintToken(ownerAddress, metadataURI)

  // The OpenZeppelin base ERC721 contract emits a Transfer event
  // when a token is issued. tx.wait() will wait until a block containing
  // our transaction has been mined and confirmed. The transaction receipt
  // contains events emitted while processing the transaction.
  const receipt = await tx.wait()
  for (const event of receipt.events) {
    if (event.event !== 'Transfer') {
        console.log('ignoring unknown event type ', event.event)
        continue
    }
    return event.args.tokenId.toString()
  }

  throw new Error('unable to get token id')
}
As you can see, calling the smart contract function is mostly like calling a normal JavaScript function, thanks to the ethers.js smart contract library (opens new window). However, since the mintToken function modifies the blockchain's state, it can't return a value right away. This is because the function call creates an ethereum transaction, and there's no way to know for sure that the block containing the transaction will actually be mined and incorporated into the blockchain. For example, there may not be enough gas to pay for the transaction.
To get the token id for our new NFT, we need to call tx.wait(), which waits until the transaction has been confirmed. The token id is wrapped inside a Transfer event, which is emitted by the base contract when a new token is created or transferred to a new owner. By inspecting the transaction receipt returned from tx.wait(), we can pull the token id out of the Transfer event.
# Storing NFT data on IPFS
The smart contract's mintToken function expects an IPFS metadata URI, which should resolve to a JSON object describing the NFT. Minty uses the metadata schema described in EIP-721 (opens new window), which supports JSON objects like this:
{
    "name": "A name for this NFT",
    "description": "An in-depth description of the NFT",
    "image": "ipfs://bafybeidlkqhddsjrdue7y3dy27pu5d7ydyemcls4z24szlyik3we7vqvam/nft-image.png"
}
The image field contains a URI that resolves to the NFT image data we want to associate with the token. This field doesn't necessarily have to be an image; it can be any file-type.
To get the metadata URI for our smart contract, we first add the image data to IPFS to get an IPFS CID and use the CID to build an ipfs:// URI. Then we create a JSON object containing the image URI along with the user-provided name and description fields. Finally, we add the JSON data to IPFS to create the metadata ipfs:// URI and feed that into the smart contract.
Minty's createNFTFromAssetData method is responsible for this process, with help from a few utility functions:
async createNFTFromAssetData(content, options) {
  // add the asset to IPFS
  const filePath = options.path || 'asset.bin'
  const basename =  path.basename(filePath)

  // When you add an object to IPFS with a directory prefix in its path,
  // IPFS will create a directory structure for you. This is nice, because
  // it gives us URIs with descriptive filenames in them e.g.
  // 'ipfs://bafybeihhii26gwp4w7b7w7d57nuuqeexau4pnnhrmckikaukjuei2dl3fq/cat-pic.png' vs
  // 'ipfs://bafybeihhii26gwp4w7b7w7d57nuuqeexau4pnnhrmckikaukjuei2dl3fq'
  const ipfsPath = '/nft/' + basename
  const { cid: assetCid } = await this.ipfs.add({ path: ipfsPath, content })

  // make the NFT metadata JSON
  const assetURI = ensureIpfsUriPrefix(assetCid) + '/' + basename
  const metadata = await this.makeNFTMetadata(assetURI, options)

  // add the metadata to IPFS
  const { cid: metadataCid } = await this.ipfs.add({
    path: '/nft/metadata.json',
    content: JSON.stringify(metadata)
  })
  const metadataURI = ensureIpfsUriPrefix(metadataCid) + '/metadata.json'

  // get the address of the token owner from options,
  // or use the default signing address if no owner is given
  let ownerAddress = options.owner
  if (!ownerAddress) {
    ownerAddress = await this.defaultOwnerAddress()
  }

  // mint a new token referencing the metadata URI
  const tokenId = await this.mintToken(ownerAddress, metadataURI)

  // format and return the results
  return {
    tokenId,
    metadata,
    assetURI,
    metadataURI,
    assetGatewayURL: makeGatewayURL(assetURI),
    metadataGatewayURL: makeGatewayURL(metadataURI),
  }
}
We're adding our data to IPFS using a path argument with a directory structure, e.g., /nft/metadata.json instead of just metadata.json. This isn't strictly necessary, but it gives us more descriptive URIs that include human-readable filenames. On the downside, the metadata URI requires a bit more space on-chain since it includes the /metadata.json portion as well as the IPFS CID. In a production environment where bytes cost money, you may want to modify the smart contract to only store the CID portion and automatically append the filename before returning the URI or simply store metadata without a directory wrapper.
# Retrieving NFT data
To view the metadata for an existing NFT, we call the smart contract's tokenURI function, then fetch the JSON data from IPFS and parse it into an object. This happens in getNFTMetadata:
async getNFTMetadata(tokenId) {
  const metadataURI = await this.contract.tokenURI(tokenId)
  const metadata = await this.getIPFSJSON(metadataURI)

  return {metadata, metadataURI}
}
See the getNFT method (opens new window) for an example that also fetches the asset data from IPFS by resolving the URI in the metadata's image field.
The getNFT method is used by the minty command-line app to view a token using the minty show <token-id> command:
minty show 14

Token ID:              14
Owner Address:         0xf39Fd6e51aad88F6F4ce6aB8827279cffFb92266
Metadata URI:          ipfs://bafybeieeomufuwkwf7sbhyo7yiifaiknm7cht5tc3vakn25vbvazyasp3u/metadata.json
Metadata Gateway URL:  http://localhost:8080/ipfs/bafybeieeomufuwkwf7sbhyo7yiifaiknm7cht5tc3vakn25vbvazyasp3u/metadata.json
Asset URI:             ipfs://bafybeifszd4wbkeekwzwitvgijrw6zkzijxutm4kdumkxnc6677drtslni/ipfs-logo-768px.png
Asset Gateway URL:     http://localhost:8080/ipfs/bafybeifszd4wbkeekwzwitvgijrw6zkzijxutm4kdumkxnc6677drtslni/ipfs-logo-768px.png
NFT Metadata:
{
  "name": "The IPFS Logo",
  "description": "The IPFS logo (768px, png)",
  "image": "ipfs://bafybeifszd4wbkeekwzwitvgijrw6zkzijxutm4kdumkxnc6677drtslni/ipfs-logo-768px.png"
}
If you have an IPFS-enabled browser like Brave (opens new window) installed, you can paste the Asset URI or Metadata URI into the address bar directly and see the content served up by your local IPFS node. If your browser doesn't support IPFS natively, you can use the Asset Gateway URL or Metadata Gateway URL instead, which will serve the data from a local HTTP gateway.
You can also try using a public gateway like the one at https://ipfs.io (opens new window). To do so, replace http://localhost:8080 in the gateway URL with https://ipfs.io. However, you may notice that this takes a little longer than requesting the same file from your local node. This is because the public gateway doesn't have a copy of the data yet, so it has to look up the CID on the IPFS network and fetch it from your local IPFS node.
# Pinning NFT data to a remote service
When you add data to IPFS, it first gets added to your local IPFS node, which advertises the CID of the data to the IPFS network. This lets anyone request the data by looking up the CID and connecting to your node directly. Once they've done so, their IPFS node will hold onto a copy temporarily, which helps speed up access to the data if another node requests it. However, by default, these extra copies will eventually expire so that people running IPFS don't use up all of their storage space.
When minting NFTs, we generally want our data to be at least as durable as the blockchain platform the token was minted on, and we want it to be available all the time and across the globe.
As an NFT minting platform, you can certainly run your own IPFS infrastructure to ensure the storage of your user's NFT assets. See the Server Infrastructure documentation to learn how an IPFS cluster can provide highly-available IPFS storage and retrieval that scales to a large volume of data and requests.
As an alternative to running your own infrastructure, you can arrange for an IPFS Pinning Service to pin your data to their IPFS nodes, which are already tuned for high volume and reliability.
Minty uses the IPFS Pinning Service API (opens new window) to request that a remote pinning service store that data for a given token, using the minty pin <token-id> command.
The default Minty configuration expects to find an environment variable name PINATA_API_TOKEN containing the JWT access token for your Pinata account. Once you have a token, you can create a file called config/default.env in the Minty repo and make it look similar to this:
PINATA_API_TOKEN="Paste JWT token here"
Now when you run minty pin, Minty should have everything it needs to connect to Pinata.
If you decide to use a different pinning service, change the configuration entry for Pinata in the config/default.js file in the Minty repo.
Here's an example of running minty pin <token-id>:
minty pin 2
Pinning asset data (ipfs://bafybeifszd4wbkeekwzwitvgijrw6zkzijxutm4kdumkxnc6677drtslni/ipfs-logo-768px.png) for token id 2....
Pinning metadata (ipfs://bafybeieeomufuwkwf7sbhyo7yiifaiknm7cht5tc3vakn25vbvazyasp3u/metadata.json) for token id 2...
🌿 Pinned all data for token id 2
This first looks up the token metadata and then sends a request to the pinning service to pin the asset CID and the metadata CID.
In the code, this happens in the pinTokenData method:
async pinTokenData(tokenId) {
  const {metadata, metadataURI} = await this.getNFTMetadata(tokenId)
  const {image: assetURI} = metadata

  console.log(`Pinning asset data (${assetURI}) for token id ${tokenId}....`)
  await this.pin(assetURI)

  console.log(`Pinning metadata (${metadataURI}) for token id ${tokenId}...`)
  await this.pin(metadataURI)

  return {assetURI, metadataURI}
}
The actual pin request is sent in the pin method:
async pin(cidOrURI) {
  const cid = extractCID(cidOrURI)

  // Make sure IPFS is set up to use our preferred pinning service.
  await this._configurePinningService()

  // Check if we've already pinned this CID to avoid a "duplicate pin" error.
  const pinned = await this.isPinned(cid)
  if (pinned) {
      return
  }

  // Ask the remote service to pin the content.
  // Behind the scenes, this will cause the pinning service to connect to our local IPFS node
  // and fetch the data using Bitswap, IPFS's transfer protocol.
  await this.ipfs.pin.remote.add(cid, { service: config.pinningService.name })
}
Because the pinning service API expects a CID and we may have a full ipfs:// URI, we use a little helper called extractCID to pull out the CID portion.
Then, we call _configurePinningService to tell IPFS to use the remote service if it hasn't already been configured.
We do a check to see if we've already pinned this CID since the API will return an error if we try to pin content that's already been pinned. Alternatively, you could just try to pin and check to see if the returned error is for duplicate content.
Finally, we call ipfs.pin.remote.add, passing in the name of the pinning service. When the pinning service receives the request, it will try to connect to our local IPFS node, and our local node will also try to connect to their IPFS nodes. Once they're connected, the service will fetch the CIDs we asked it to pin and store the data on their infrastructure.
To verify that the data was pinned, you can run ipfs pin remote ls --service=pinata to see a list of the content you've pinned to Pinata. If you don't already have a copy of IPFS installed on your machine, you can use the one bundled with Minty by running npx go-ipfs pin remote ls --service=pinata instead. Alternatively, you can log into the Pinata website (opens new window) and use the Pin explorer to view your data.
# Next steps
That was quite a lot to cover! We've seen how to add assets to IPFS and create NFT metadata, how to link our metadata to a new NFT on Ethereum, and how to pin our data with a remote provider for persistence.
At this point, you might be wondering how to take these techniques and use them to build a production NFT minting platform. Of course, there are many decisions involved in any new product or marketplace, so we can't think of everything here. But there are a few places where Minty is clearly not production ready, and by looking at them, we can get a good idea of what technical work might be involved.
As a command-line app, minty is a pretty big departure from the rich, interactive web applications that power NFT minting platforms. If you want to build a web platform based on the techniques shown in Minty, you will either need to expose Minty's functionality via an HTTP API or go the fully decentralized route and interact with the NFT contract directly in the user's Ethereum-enabled web browser. The good news is that all of the concepts we've learned so far are applicable to either environment.
Since Minty currently runs on Node.js, it's straightforward to add an API server using one of the many Node HTTP frameworks like Express (opens new window) or Koa (opens new window). However, it can be difficult to allow users to sign Ethereum transactions with their own private keys if the code is running on a backend server. As such, you may want to put some blockchain logic in the frontend so that users can use MetaMask (opens new window) or a similar wallet to authorize token transfers.
Work is also underway to support the remote pinning service API (opens new window) in js-ipfs, so soon you'll be able to run the entire process in the user's browser using an embedded IPFS node.
If you're building a d-app without a backend server today and just can't wait, you could also use an HTTP API provided by a pinning service to send and pin content using traditional HTTP requests instead of embedding js-ipfs into your d-app. See Pinata's documentation (opens new window) for an example. This makes your d-app code a little less generic since it's tied to one provider's API, but it may be a good way to get started. Doing everything in the browser also means you'll need to carefully manage the API tokens for the pinning services you support, perhaps by allowing users to add their own credentials and storing the tokens in the browser's local storage.
Finally, please consider that the Minty smart contract is intentionally very simple and is not tailored to the needs of a production platform. In particular, it lacks access controls (opens new window) and is not upgradable (opens new window) without re-deploying the contract. Chances are you'll want your contract to include features that are unique to your platform as well, beyond the base ERC-721 functionality.
Thanks for following along! We can't wait to see what you'll build.